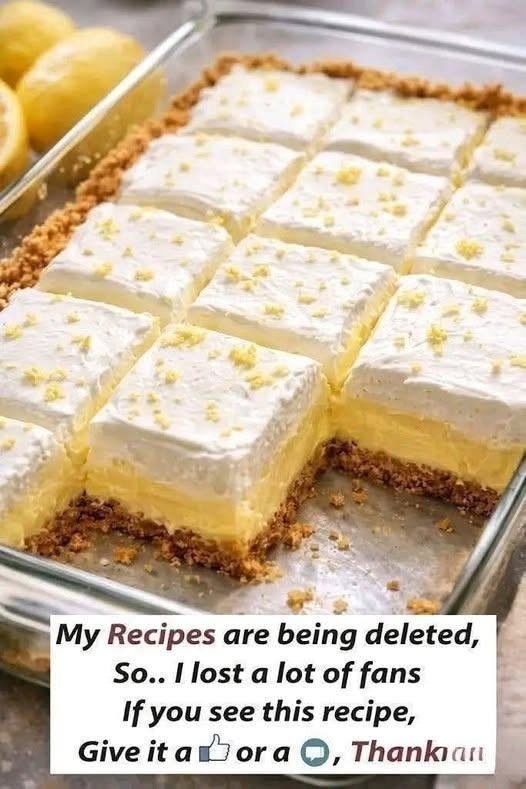
When the weather gets warm or your schedule gets incredibly busy, the last thing you want to do is turn on your big kitchen oven and heat up your entire house just to make something sweet. This no bake lemon dessert recipe is the ultimate solution for anyone who wants a spectacular, restaurant quality sweet treat without dealing with any complicated baking rules or hot appliances. It is a beautiful, layered icebox style dessert that blends a buttery, crunchy biscuit crust with a silky smooth, bright citrus filling and a cloud like whipped topping. Every single bite feels like a breath of fresh air on your tongue because it perfectly balances the intense tartness of fresh yellow lemons with the rich, velvety sweetness of cream and milk. This recipe is all about simple kitchen magic where basic everyday ingredients transform overnight into an elegant, sliceable masterpiece that will leave everyone at your table completely speechless.
People absolutely love this recipe because it is incredibly reliable, easy to assemble, and gives you a massive reward for very little physical effort. In our fast paced world, finding a dessert that looks like it took hours to prepare but actually comes together in less than twenty minutes of active kitchen work is a massive win for busy home cooks. Newbie bakers love it because there is absolutely zero risk of burning a crust, dealing with sunken cake centers, or overcooking a delicate egg custard on the stove. It is also an incredibly budget friendly choice that uses common pantry items you can easily find at any local grocery store, meaning you do not have to hunt for rare or expensive specialty ingredients. It has a beautiful retro charm that reminds people of old fashioned family gatherings, bringing back happy childhood memories while still tasting modern, light, fresh, and completely gourmet.
There are so many perfect moments to bring this sweet lemon creation into your life, whether you are hosting a lively backyard barbecue or looking for a bright pick me up after a long, stressful work week. From an emotional standpoint, lemon has a natural ability to make people feel happy, energized, and refreshed, instantly lifting the mood in any room the moment you bring it out. On the taste side, it hits that perfect sweet and sour sweet spot that cleanses your palate after a heavy savory meal, making it the ideal conclusion to a rich dinner party. If you are watching your fitness or prefer lighter treats, this recipe is a wonderful option because the bright citrus flavors satisfy your sweet tooth completely without needing the heavy, dense flour and lard mixtures found in traditional baked pastries. It is the ultimate feel good dessert that satisfies your cravings while keeping your energy levels high, bright, and vibrant.
You can easily adapt this versatile dish to fit into your weekly routine, making it a day ahead of time for weekend pool parties or keeping small portions tucked away in your freezer for a quick midnight snack. It travels beautifully in a cooler bag, making it a fantastic contribution to community potlucks, church socials, or sunny beach picnics with your closest friends. Whenever you want to show someone you care about them but do not have the time or energy to spend a whole afternoon monitoring a hot oven, this dish stands ready to save the day. It reminds us that dessert should be a pure, stress free joy to create and share with the people we love most in our lives. By keeping things simple and focusing on bright, natural flavors, you create a memorable dining experience that celebrates the sunny, bright side of homemade sweet treats.
Ingredients You Will Need
To create this stunning no bake lemon dessert, you will need to gather a few simple ingredients from your kitchen cupboards and refrigerator. Here is everything you need, along with the precise measurements to guarantee your dessert sets beautifully and tastes absolutely perfect.
-
250 grams of sweet digestive biscuits or graham crackers
-
100 grams of unsalted butter, melted completely
-
400 grams of sweetened condensed milk, which is one standard can
-
250 grams of full fat cream cheese, softened at room temperature
-
200 milliliters of heavy whipping cream, kept very cold
-
150 milliliters of freshly squeezed lemon juice, about four large lemons
-
2 tablespoons of fresh lemon zest, grated very finely
-
1 teaspoon of pure vanilla extract, for a warm aroma
-
3 tablespoons of powdered sugar, adjusted to your sweetness preference
-
1 whole lemon, sliced into thin rounds for a beautiful final decoration
Step by Step Method
Creating this no bake lemon dessert is a fun, relaxing, and straightforward process that even absolute beginners can complete with total confidence. Follow these clear steps carefully to build your beautiful layered citrus masterpiece.
Preparing the Baking Dish
Start by selecting a high quality square or rectangular baking dish, ideally measuring about twenty centimeters by twenty centimeters. You can use a glass dish or a ceramic pan, depending on what you have available in your kitchen cabinets. Take a piece of parchment paper and line the inside of the dish, leaving a few centimeters of extra paper hanging over the edges like small handles. This clever trick ensures you can easily lift the entire dessert out of the pan for clean, perfect slicing once it has fully set in the fridge. If you do not have parchment paper, you can simply use a tiny bit of melted butter to grease the pan lightly.
Crushing the Biscuits
Take your sweet digestive biscuits or graham crackers and place them inside a large, clean zip top plastic bag. Seal the bag tightly, making sure to push out most of the air so it does not pop while you are working. Use a wooden rolling pin, a heavy frying pan, or even a sturdy drinking glass to smash the biscuits until they turn into a fine, sandy crumb texture. You want to make sure there are no large, stubborn chunks left behind, as fine crumbs hold together much better. If you have an electric food processor, you can pulse the biscuits inside it for thirty seconds to speed up the process.
Mixing the Crunchy Crust Base
Pour your fine biscuit crumbs out of the plastic bag and into a medium sized mixing bowl. Pour your melted unsalted butter directly over the crumbs, ensuring you catch every single golden drop. Use a sturdy spoon or a rubber spatula to mix the two ingredients together thoroughly until all the crumbs are evenly coated in the butter. The mixture should feel like wet beach sand and should hold its shape when you squeeze a small amount together in the palm of your hand. If it feels too dry, you can add a tiny splash of extra melted butter.
Pressing the Crust into the Pan
Dump the buttery biscuit crumbs into the bottom of your prepared baking dish. Use your clean hands, the back of a large metal spoon, or the flat bottom of a measuring cup to press the crumbs down firmly and evenly across the entire base of the pan. You want to press hard enough to create a solid, compact layer that will not crumble apart when you slice the dessert later. Pay special attention to the corners and edges to ensure the crust is level throughout. Once you are finished, place the dish into your refrigerator to chill and firm up while you prepare the creamy filling.
Beating the Cream Cheese
In a large mixing bowl, place your softened full fat cream cheese, making sure it has spent at least one hour on your kitchen counter so it is easy to blend. Use an electric hand mixer or a sturdy wire whisk to beat the cream cheese for about two minutes until it becomes completely smooth, fluffy, and free of any tiny lumps. This step is incredibly important because if the cream cheese is too cold or stiff, it will leave small white flecks throughout your final dessert filling.
Adding the Sweetened Condensed Milk
Pour the entire can of sweetened condensed milk slowly into the fluffy cream cheese, mixing continuously on a low speed setting. Use your rubber spatula to scrape down the sides and the very bottom of the bowl so everything incorporates perfectly. The thick condensed milk adds a gorgeous velvety sweetness and a rich texture that helps the filling solidify later without needing any artificial gelatin powder. Continue mixing until the two ingredients form a thick, glossy, and uniform cream.
Incorporating the Fresh Lemon Juice and Zest
Now, add your freshly squeezed lemon juice, your finely grated lemon zest, and your pure vanilla extract into the cream cheese mixture. As you stir the lemon juice into the bowl, you will notice a fascinating bit of food science happening right before your eyes. The natural acid in the fresh lemon juice reacts instantly with the dairy proteins, causing the thick mixture to thicken up even more into a gorgeous, luscious custard. Keep stirring gently until the lemon juice is completely integrated and the filling is thick and fragrant.
Whipping the Heavy Cream
In a separate clean medium bowl, pour your ice cold heavy whipping cream. Use clean beaters on your electric mixer to whip the cream on high speed until it starts to thicken up and hold its shape. Sift in your powdered sugar slowly as you whip to give it a touch of extra stability and sweetness. Continue whipping until the cream forms stiff peaks, meaning it stands straight up when you lift the beaters out of the bowl. Be careful not to overwhip the cream, or it will turn chunky and look like butter.
Folding the Whipped Cream Together
Take about one third of your stiff whipped cream and drop it into your bowl of thick lemon cream cheese mixture. Use a rubber spatula to fold it in very gently, moving your hand in a circular pattern from the bottom of the bowl to the top. This softens the thick filling up so you can add the rest of the whipped cream without knocking out all the trapped air. Add the remaining whipped cream and fold gently until you have a light, airy, and beautiful pale yellow cloud like mixture with no streaks remaining.
Assembling and Chilling the Masterpiece
Take your chilled crust out of the refrigerator and pour the fluffy lemon filling directly over the top of the firm biscuit base. Use the flat edge of your spatula to smooth out the surface of the filling, spreading it carefully into all four corners of the dish to create a gorgeous, level top layer. Cover the baking dish tightly with a sheet of plastic wrap to protect it from any strong refrigerator odors. Place the dessert into the coldest part of your fridge for at least six hours, though leaving it overnight is highly recommended for the absolute best sliceable results.
Decorating and Serving Your Dessert
When you are ready to serve, remove the plastic wrap and use the parchment paper handles to lift the chilled dessert gently out of the baking dish and onto a flat cutting board. Take your fresh lemon slices and arrange them beautifully along the top surface of the dessert, adding a few sprigs of fresh mint leaves if you want an extra touch of color. Dip a large, sharp chef knife into hot water and wipe it dry before making your first clean cut. Repeat the hot water dip between every single slice to ensure you get gorgeous, clean squares that look professional and picture perfect on the serving plates.
Why This Recipe Is Special
This no bake lemon dessert is an incredibly special addition to your recipe book because it delivers an amazing combination of rich health benefits, pure ingredients, and an unforgettable flavor experience. First of all, using fresh, real lemons provides your body with a massive dose of natural vitamin C, an essential nutrient that boosts your body immune defenses, protects your skin cells, and helps you feel vibrant and healthy. Unlike store bought boxed desserts that are packed full of artificial chemical colorings, factory preservatives, and weird fake lemon flavorings, this homemade creation relies on the authentic, powerful punch of real fruit and high quality dairy products. You can feel wonderful serving this to your loved ones because you know exactly what went into the mixing bowl.
Another element that makes this dish stand out is its incredible texture profile, which provides a beautiful surprise with every single mouthful. The base of the dessert is a firm, crunchy biscuit crust that has a wonderful, salty sweet contrast thanks to the rich unsalted butter. Sitting right on top of that crunchy foundation is a filling that is impossibly silky, light, and cloud like, dissolving effortlessly on your tongue like a gentle citrus mousse. This brilliant contrast between the crispy bottom and the smooth, airy top ensures that the dessert never feels boring or one dimensional, keeping your taste buds happy and completely engaged from start to finish.
Finally, the flavor balance of this recipe is a true masterpiece of simple culinary art. Sweetened condensed milk can sometimes feel overly sweet on its own, but when it is combined with the sharp, crisp acid of fresh lemon juice, the two flavors neutralize each other beautifully. The result is a dessert that tastes bright, uplifting, and mature, rather than just sugary and heavy. It acts as the perfect palate cleanser after a long dinner, leaving you feeling satisfied, refreshed, and light on your feet, rather than weighed down by a heavy baked pastry.
Extra Tips for Better Taste
If you want to customize this no bake lemon dessert or elevate it for a special holiday celebration, there are several wonderful creative paths you can explore in your kitchen. For an incredible tropical twist, you can swap out half of the lemon juice for fresh lime juice, creating a beautiful lemon lime flavor profile that feels like a sunny vacation in a dish. You could also sprinkle a handful of toasted shredded coconut over the top layer of the dessert just before serving to add an extra layer of exotic nuttiness and a fantastic chewy texture.
For people who absolutely adore a rich berry combination, you can create a quick homemade raspberry or blueberry sauce by simmering fresh berries with a spoonful of sugar on the stove until they break down. Allow the berry sauce to cool completely, then drizzle it generously over each individual square just before you pass the plates around to your guests. The deep red or purple berry colors look absolutely stunning against the pale yellow lemon cream, and the flavor combination of berries and citrus is a classic match made in culinary heaven.
Another fantastic tip for improving the crust is to experiment with different types of crunchy biscuits from the supermarket cookies aisle. Try using ginger snap cookies or spiced Speculoos biscuits instead of standard graham crackers to create an incredibly warm, spicy foundation that contrasts beautifully with the cold, tart lemon filling. The natural warmth of ginger and cinnamon cuts through the creamy dairy elements in a spectacular way, giving your homemade dessert a unique, artisanal flair that will have everyone begging you for your secret recipe.
Final Thoughts
Creating a beautiful homemade no bake lemon dessert is a wonderful reminder that cooking does not have to be stressful, complicated, or hot to be absolutely extraordinary. By taking a few simple, wholesome ingredients and allowing the cool air of your refrigerator to work its magic, you can create a stunning centerpiece that brings joy, brightness, and comfort to any table. This dessert is a true celebration of fresh citrus and effortless entertaining, proving that the best things in life are often the simplest ones to make. So pick up some fresh yellow lemons, enjoy the sweet process of mixing it all up, and share a bright, cool slice of happiness with the people who matter most to you.
Nutrition Details
Staying informed about what you put into your body is a fantastic way to enjoy your favorite sweet treats with complete peace of mind. This clear nutrition table provides an estimated breakdown of the dietary components found in this luscious no bake lemon dessert, calculated for a single serving assuming the entire dish is cut into nine equal squares.
| Nutrient Type | Amount Per Serving | Daily Value Percentage |
| Calories | 340 calories | 17 percent |
| Total Fat | 22 grams | 28 percent |
| Saturated Fat | 13 grams | 65 percent |
| Cholesterol | 55 milligrams | 18 percent |
| Sodium | 190 milligrams | 8 percent |
| Total Carbohydrates | 32 grams | 12 percent |
| Dietary Fiber | 1 gram | 4 percent |
| Sugars | 24 grams | no established value |
| Protein | 5 grams | 10 percent |
| Vitamin C | 12 milligrams | 15 percent |
| Calcium | 90 milligrams | 7 percent |
Disclaimer
Please remember that every individual human body operates differently, and individual metabolic rates, health conditions, and daily nutritional goals vary greatly from person to person. The detailed dietary values shown in the table above are general estimates based on standard nutritional data databases and can change depending on the specific product brands, fat percentages, or minor adjustments you make to the recipe in your home. If you have specific medical conditions, food allergies, or unique dietary guidelines managed by a professional, please consult with your primary doctor or a certified health