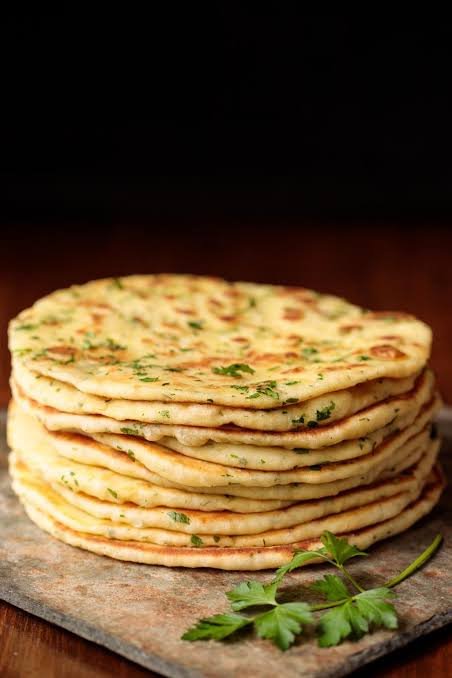
Fresh homemade bread has a magical way of filling your kitchen with warmth, comfort, and amazing smells that instantly make you feel at home. Bazlama is a famous traditional flatbread from Turkey that has been loved by families for many generations because of its thick, pillowy structure and soft texture. Unlike standard store bought bread that often feels dry or plain, this special flatbread is super fluffy and stays soft for a very long time thanks to the natural magic of creamy yogurt added directly into the dough. When you bake it on a warm skillet or pan, it puffs up like a soft little pillow and forms beautiful light brown spots on top that make it look and taste completely delicious. Making this flatbread in your own kitchen is a wonderfully rewarding experience because it lets you create genuine bakery style food using simple everyday ingredients that you probably already have sitting in your kitchen cabinet.
People all over the world fall deeply in love with this traditional Turkish flatbread from the very first bite because the taste and texture are simply incredible. The addition of full fat Greek yogurt or natural plain yogurt makes the inner bread center extra tender, while giving the flavor a very light and pleasant tanginess that balances perfectly with melted butter. It is far softer than regular flatbreads or plain pita bread, which means it will not crack or break when you fold it, dip it, or roll it up with your favorite fillings. Children love eating it warm straight off the pan with a little honey or butter spread over the surface, while adults appreciate how easily it pairs with savory meals, grilled meats, fresh vegetables, and tasty cheeses. Every single bite offers a beautiful combination of a slightly crisp outer layer and a soft interior that practically melts on your tongue, making it impossible to eat just one piece.
There are so many wonderful occasions and emotional reasons to bring this warm Turkish flatbread recipe into your daily life and routine. Cooking this bread at home is a peaceful activity that can help you slow down, relax, and enjoy the simple therapeutic process of working with dough after a long and busy week. It is perfect for lazy weekend breakfasts where you sit down with your loved ones, pour a hot cup of tea or coffee, and enjoy fresh food cooked with care and love. Fitness lovers and health conscious eaters also love this recipe because using real plain yogurt adds natural protein and helpful healthy gut bacteria, making it a much better option than factory processed breads full of chemical preservatives. Whether you want to surprise your family with an amazing homemade breakfast, pack a healthy lunch box for your children, or prepare a cozy evening meal, this bread brings pure joy and delicious satisfaction to any table setting.
Learning how to bake this simple bread is also a fantastic journey for beginner cooks who want to build real confidence in their cooking and baking skills without getting overwhelmed. You do not need any special electric bread machines, professional baking tools, or complicated kitchen equipment to achieve fantastic results on your very first attempt. Everything is mixed inside one simple bowl, kneaded gently by hand for a few short minutes, and then cooked right on top of your stove using a basic skillet or nonstick pan. As you watch the dough rise into a smooth ball and then puff up nicely while cooking on the stove top, you will feel a great sense of pride and accomplishment that only homemade cooking can give. This article will guide you through every single step with super clear explanations, simple helpful tips, and easy instructions so you can bake the softest and most flavorful flatbreads right inside your own home today.
Ingredients You Will Need
To make eight delicious and fluffy flatbreads, you will need the following simple ingredients measured accurately:
- Three and a half cups of all purpose white flour or plain flour
- One cup of plain yogurt or Greek yogurt at room temperature
- Three quarters of a cup of warm water
- Two teaspoons of active dry yeast or instant yeast
- One teaspoon of white granulated sugar
- One teaspoon of fine sea salt or cooking salt
- Two tablespoons of olive oil or vegetable oil
- Two tablespoons of melted butter for brushing on top after cooking
- Two tablespoons of freshly chopped parsley for garnish if you like
Step by Step Method
Step One: Prepare The Yeast Mixture
Take a medium mixing bowl and pour in three quarters of a cup of warm water. Make sure the water is comfortably warm to the touch but not boiling hot, because water that is too hot will destroy the yeast. Add one teaspoon of white granulated sugar and two teaspoons of active dry yeast into the warm water. Stir the liquid gently with a spoon for about thirty seconds until the sugar dissolves completely. Set the bowl aside on your kitchen counter for about five to ten minutes without touching it. You will know the yeast is activated and ready when you see a soft layer of foam and bubbles form across the top surface of the water.
Step Two: Combine The Ingredients
In a separate large mixing bowl, add three and a half cups of all purpose flour and one teaspoon of fine sea salt. Use a whisk or a fork to mix the flour and salt together evenly. Make a small well or hole right in the center of your flour mixture. Pour your foamy yeast liquid into the center well. Add one cup of room temperature plain yogurt and two tablespoons of olive oil into the bowl. The yogurt adds wonderful moisture and soft texture, so make sure it is not cold straight from the refrigerator, as cold ingredients can slow down the dough rising process.
Step Three: Knead The Dough Until Smooth
Use a large wooden spoon or your clean hands to mix all the ingredients together inside the bowl until a rough dough starts to form. If the dough feels a bit too dry, you can add one small tablespoon of warm water. If the dough feels sticky, add one extra tablespoon of flour. Turn the dough out onto a clean, flat kitchen counter lightly dusted with flour. Knead the dough gently with the palms of your hands for about seven to ten minutes. Push the dough forward, fold it back over itself, and turn it slightly as you work. You are looking for a very soft, smooth, and stretchy dough that feels pleasant and slightly elastic.
Step Four: Let The Dough Rest And Rise
Lightly grease the inside of your clean mixing bowl with a tiny splash of olive oil so the dough does not stick to the sides. Place your smooth dough ball right in the center of the greased bowl. Cover the bowl securely with a clean kitchen towel or a sheet of plastic wrap. Place the bowl in a warm, quiet spot in your kitchen away from cool air breezes. Let the dough rest undisturbed for about one hour, or until it doubles in size. The gentle warmth helps the yeast feed on the natural carbohydrates, creating tiny air pockets that make your final flatbread wonderfully soft and airy inside.
Step Five: Divide And Shape The Portions
Once the dough has doubled in size, gently press your fist into the center of the dough to release the trapped air bubbles. Transfer the soft dough onto a lightly floured surface. Use a knife or dough cutter to divide the dough into eight equal pieces. Take each piece of dough and roll it gently between your palms to create eight smooth round balls. Place the dough balls on your floured surface and cover them loosely with a damp kitchen towel. Let them rest quietly for ten minutes. Resting the dough allows the gluten strands to relax, which makes rolling out the flatbreads much easier without the dough springing back.
Step Six: Roll Out The Flatbreads
Take one ball of dough at a time while keeping the remaining balls covered under the towel so they do not dry out. Sprinkle a tiny bit of flour onto your rolling pin and work surface. Gently press down on the dough ball with your fingers to flatten it into a thick disc. Use your rolling pin to gently roll the dough into a smooth circle that is about six or seven inches wide and roughly half an inch thick. Be careful not to roll the bread too thin, because Bazlama is meant to be a thick, soft, pillowy flatbread rather than a thin wrap or crispy cracker.
Step Seven: Cook On A Warm Skillet
Heat a heavy skillet, cast iron pan, or nonstick frying pan over medium heat on your stove top. You do not need to add any oil or butter to the dry pan. Once the pan is nice and warm, carefully lay your rolled out flatbread onto the center of the pan. Cook the bread for about two to three minutes on the first side. You will see gentle air bubbles begin to puff up across the surface. Flip the flatbread over to the second side using a flat spatula and cook for another two minutes until light golden spots appear on the bottom.
Step Eight: Flip And Watch It Puff
Flip the flatbread one more time back to the first side. This final flip encourages the hot air trapped inside to expand, causing the flatbread to puff up like a large soft ball. Press down very gently on the edges with your spatula to distribute the steam evenly throughout the inside. Cook for one final minute until both sides have beautiful light brown spots and the inside is fully cooked through. Remove the flatbread carefully from the hot skillet and place it onto a clean plate lined with a cloth towel.
Step Nine: Brush With Butter And Serve Warm
While the cooked flatbread is still steaming hot, brush the top surface generously with melted butter using a pastry brush. If you like extra herbal flavor, sprinkle a tiny pinch of fresh chopped parsley over the buttery top. Cover the cooked flatbread with a clean kitchen towel while you repeat the cooking process for the remaining dough balls. Stacking the warm breads together under the cloth towel traps the soft steam, keeping every single piece amazingly soft, warm, and tender until you are ready to serve them at your dining table.
Why This Recipe Is Special
This traditional Turkish flatbread recipe holds a very special place in the world of home baking because it blends deep cultural tradition with incredible simplicity. The secret ingredient that sets this bread apart from almost every other basic recipe is the generous amount of natural yogurt folded straight into the dough. Yogurt works like a natural softener that breaks down tough gluten strands, resulting in a rich texture that stays unbelievably soft even hours or days after cooking. Ordinary flatbreads made with only flour and water tend to get hard, chewy, or rubbery as soon as they cool down, but this yogurt based creation retains its delightful pillowy texture and fresh taste without needing artificial additives or chemical bread softeners.
From a wellness and health point of view, making your own bread at home gives you complete power and control over every single ingredient you feed your body and family. Standard commercial grocery store breads are frequently loaded with hidden sugars, high amounts of sodium, refined oils, and chemical stabilizers designed to extend shelf life on store display shelves. This simple home recipe contains pure, natural ingredients like wheat flour, rich yogurt, heart healthy olive oil, and basic yeast. Yogurt brings natural calcium, essential protein, and beneficial organic compounds that support smooth digestion and natural gut health, making this flatbread a wholesome choice for everyday meal planning.
The outstanding flavor profile is another big reason why home cooks adore this classic flatbread recipe. It features a delicate balanced flavor that is light, rich, and slightly tangy from the yogurt, making it amazingly versatile for any dining situation. It is gentle enough to serve alongside sweet jams, golden syrup, or wild honey for a delightful morning meal, yet savory enough to complement spicy curries, rich stews, grilled meats, and fresh garden salads for dinner. Furthermore, the quick stove top cooking method saves energy and time because you do not need to preheat a large, hot home oven, allowing you to prepare fresh, delicious hot bread on short notice any day of the week.
Extra Tips For Better Taste
To take your homemade Turkish flatbread from good to absolute perfection, a few creative tricks and expert tips can make a huge difference in your cooking results. First, always make sure your plain yogurt is at room temperature before adding it to the flour mixture. If you use ice cold yogurt straight from your refrigerator, it lowers the overall temperature of your dough, which slows down the active yeast growth and prevents the bread from rising high and fluffy. You can simply take your yogurt out of the fridge about thirty minutes before you plan to start cooking so it reaches a comfortable ambient temperature.
Another wonderful tip for creating maximum flavor is experimenting with herbal garlic butter for brushing on top of the cooked breads. Instead of using plain melted butter, gently warm your butter in a small pan with a clove of finely minced fresh garlic and a pinch of dried oregano or chili flakes. Brushing this rich, aromatic garlic butter over the hot bread right after it leaves the pan creates an irresistible restaurant quality flavor that will impress everyone at your table. You can also mix dried herbs like thyme, rosemary, or toasted sesame seeds directly into the dry flour before adding liquid ingredients to infuse lovely aromatic flavor throughout the bread dough itself.
Controlling your stove top cooking temperature is another vital key to getting perfect flatbreads every single time. If your pan is not hot enough, the dough will dry out and turn tough before it has a chance to cook through or puff up properly. On the other hand, if your stove heat is set too high, the outside surface will scorch and burn black while the inner dough stays raw and doughy. Aim for a steady medium heat setting, and give your pan a few full minutes to warm up thoroughly before laying down your first rolled dough disc. If you notice dark flour burning on the bottom of your pan between breads, carefully wipe the pan clean with a dry paper towel before cooking the next piece.
Finally, proper storage techniques will help you enjoy these delicious flatbreads long after your baking session is done. If you happen to have leftover flatbreads, allow them to cool down completely on a wire rack at room temperature. Once cooled, seal them inside an airtight plastic freezer bag or sealed container. They will stay fresh and soft on your kitchen counter for up to two days. You can also freeze the cooked flatbreads by placing small sheets of parchment paper between each piece so they do not stick together. Whenever you feel like enjoying fresh bread, simply pop a frozen flatbread into a warm pan or toaster for one minute, and it will taste just as soft and fresh as the day you made it.
Final Thoughts
Baking your own Bazlama flatbread at home is a wonderfully satisfying cooking adventure that brings warm comfort, amazing aromas, and incredible natural taste directly into your home kitchen. You do not need years of master baking experience or expensive tools to create these lovely, pillowy breads that look and taste like they came from a traditional Turkish street market. With just a handful of simple ingredients like flour, yogurt, and yeast, you can transform basic pantry staples into a warm, comforting meal component that your friends and family will ask for again and again. Give this easy recipe a try during your next cooking session, enjoy the simple calming process of shaping dough by hand, and savor every delicious warm bite with your favorite meals.
Nutrition Details
Here is an estimated nutrition overview for the entire recipe batch as well as individual servings to help you track your daily food intake easily:
Recipe Total And Per Serving Values
| Nutrient Name | Entire Recipe Total | Per Single Serving |
| Serving Size | 8 Flatbreads Total | 1 Flatbread |
| Calories | 1920 Calories | 240 Calories |
| Total Fat | 48 Grams | 6 Grams |
| Saturated Fat | 18 Grams | 2.2 Grams |
| Trans Fat | 0 Grams | 0 Grams |
| Cholesterol | 40 Milligrams | 5 Milligrams |
| Sodium | 2240 Milligrams | 280 Milligrams |
| Total Carbohydrates | 312 Grams | 39 Grams |
| Dietary Fiber | 12 Grams | 1.5 Grams |
| Total Sugars | 16 Grams | 2 Grams |
| Protein | 56 Grams | 7 Grams |
| Calcium | 320 Milligrams | 40 Milligrams |
| Iron | 16 Milligrams | 2 Milligrams |
Disclaimer
Nutrition values provided in this article are simple estimates calculated using standard ingredient databases and basic home cooking measurements. Actual nutritional numbers may change based on specific brand ingredients, type of yogurt used, flour choices, and exact butter amounts applied during cooking. Everyone’s body, health needs, and dietary requirements are completely different, so personal health outcomes and dietary results will naturally vary from person to person. This article is written for general informational and educational purposes only and should not replace professional medical advice, official nutritional counseling, or personal healthcare guidance from a certified doctor or dietitian.