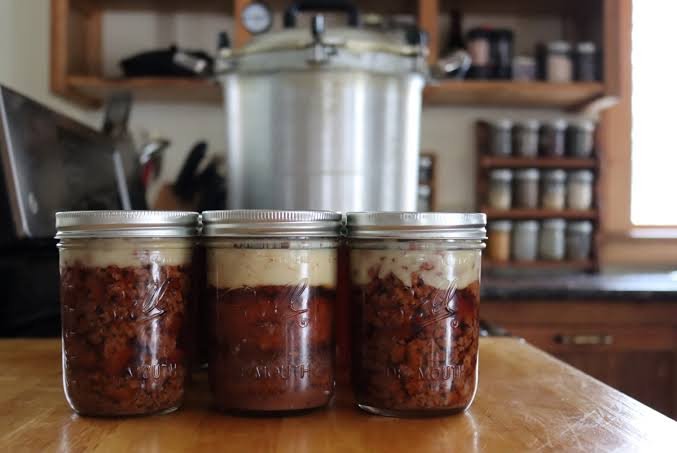
Canning ground beef at home is one of the most useful skills you can learn if you want to save time, save money, and keep your pantry filled with delicious real food. This complete guide will show you every single step needed to turn fresh raw ground meat into perfectly preserved jars of cooked beef that can sit on your pantry shelf for months or even years. When you have pre cooked meat ready to go in glass jars, you can pull together a hot and hearty dinner in just five or ten minutes after a long day of work. You will learn how to cook the meat properly, how to pack it into clean glass jars, and how to safely process it using a pressure canner so that it stays fresh without any refrigeration required. This simple preservation process turns busy weeknight chaos into smooth sailings because your main protein source is already fully prepared and waiting for you on the shelf.
People all over the world absolutely love canning ground beef because it brings unmatched convenience and incredible peace of mind into their everyday daily life. Imagine coming home very tired after a long hard work day and knowing that you do not need to wait for frozen meat to thaw out in the sink or microwave. You simply open a jar of homemade preserved beef, dump it into a hot pan, add your favorite herbs or sauces, and you have a nutritious warm meal on the dinner table instantly. Another big reason why home cooks fall in love with this traditional method is the huge amount of money it saves on grocery bills every single year. You can buy fresh ground meat in large bulk quantities when it goes on sale at your local grocery store, process it all at home in one afternoon, and lock in those low prices forever without wasting valuable freezer space.
There are so many wonderful moments when having canned ground beef on your pantry shelves feels like a true life saver for you and your family. If you are someone who cares deeply about health and fitness, having clean protein fully prepared without extra preservatives or weird ingredients helps you stick to your daily nutrition goals effortlessly. It is also an amazing project for emotional peace because having a well stocked pantry brings a comforting sense of safety during rainy weather, power outages, or emergency situations when grocery stores might be closed. Beyond fitness and security, the taste of pressure canned beef is remarkably tender, soft, and juicy because the heat breaks down the muscle fibers while locking in every bit of savory flavor. You can use it for quick taco nights, warm winter chili bowls, rich spaghetti meat sauces, or comforting casserole dishes anytime you crave a cozy homemade meal.
Taking control of your family food supply through home canning gives you complete confidence about what goes into your body every single day. When you purchase store bought canned meat, you often get high amounts of sodium, artificial preservatives, and mystery chemicals that you might not want to consume. Home canning allows you to choose high quality beef from local farmers or organic markets and control every pinch of salt that enters the jar. It transforms fresh ground meat into a soft crumble that absorbs herbs, spices, and vegetable juices far better than freshly browned meat ever could. Whether you are trying to simplify your meal prep routines, lower your household budget, build up your long term emergency food stash, or simply enjoy softer and more flavorful beef in your favorite recipes, this simple canning technique will quickly become one of your absolute favorite cooking habits.
Ingredients You Will Need
To prepare and process ten pint size glass jars of canned ground beef safely, you will need the following simple ingredients and basic supplies:
10 pounds of lean ground beef, preferably 85 percent to 90 percent lean ground meat 2 tablespoons of coarse canning salt or pure sea salt without iodine or anti caking agents 5 cups of hot boiling water or fresh unsalted beef broth 1 tablespoon of black pepper if you want extra subtle background flavor 10 pint size glass mason jars made specifically for home canning 10 brand new flat canning lids with rubber sealing rings 10 metal screw bands or rings to hold the flat lids securely in place 2 tablespoons of distilled white vinegar for wiping the glass jar rims clean
Step By Step Method
Step 1 Prepare your kitchen work surface by thoroughly washing your counter tops, cookware, and all tools with hot soapy water. Wash your glass mason jars in warm soapy water and rinse them clean. Place the clean jars inside your pressure canner filled with a few inches of warm water so the jars stay warm and do not crack when you fill them later.
Step 2 Place a large heavy bottom pan or skillet on your stove top over medium high heat. Add the ten pounds of ground beef to the pan in small batches so you do not overcrowd the pan. Use a wooden spatula or meat chopper to break the ground meat into small uniform crumbs as it cooks.
Step 3 Cook the ground beef until it is lightly browned and no longer pink in the middle. You do not need to crisp the meat or cook it completely dry. You only want to brown the meat lightly and release the bulk of the internal fat and natural juices from the ground beef.
Step 4 Once the ground meat is browned, carefully drain away all excess liquid fat from the skillet. You can pour the meat into a large colander placed inside your sink to let the warm grease drip out completely. Removing as much grease as possible is vital because excess fat can prevent the glass jars from forming a proper airtight seal during the canning process.
Step 5 Bring a separate saucepan filled with fresh water or unsalted beef broth to a rolling boil over high heat on your stove top. Keep this liquid boiling hot because you will pour it directly over the cooked ground beef inside your glass jars.
Step 6 Remove your warm glass mason jars from the canner and place them on a thick clean towel spread across your kitchen counter. Using a wide mouth funnel, carefully spoon the browned ground beef into each warm glass jar.
Step 7 Leave a generous one inch space between the top of the ground beef and the top rim of the glass jar. This empty space at the top of the jar is called headspace, and it allows the food to expand safely while under pressure.
Step 8 Add one half teaspoon of coarse canning salt to each pint jar if you want to season the meat. Adding salt is completely optional and serves only for flavor, so you can leave it out if you prefer low sodium meals.
Step 9 Carefully pour the boiling hot water or hot beef broth into each jar over the ground meat. Make sure to maintain that exact one inch headspace at the very top of each jar.
Step 10 Insert a small plastic bubble remover tool or a smooth silicone spatula inside each glass jar. Gently slide the tool down along the inner walls of the jar to release any trapped air bubbles hidden inside the packed ground beef.
Step 11 Dip a clean paper towel into a small bowl filled with distilled white vinegar. Carefully wipe the top glass rim of every single jar to clean away any tiny bits of meat grease, salt, or moisture that might stop the flat lids from sealing properly.
Step 12 Center a fresh flat canning lid on top of each cleaned glass rim. Screw the metal ring band over the lid until it is fingertip tight. Do not tighten the metal bands too hard with your full strength, as air needs to escape from the jar during the heating process.
Step 13 Place the filled and closed glass jars into your pressure canner which should contain two to three inches of hot water. Lock the pressure canner lid securely into position according to the manufacturer instructions for your specific unit.
Step 14 Turn the stove top heat to high and let steam vent continuously from the open petcock or vent pipe for ten full minutes. This ten minute venting step flushes out all cold air and creates a pure steam environment inside the pressure canner.
Step 15 After ten minutes of venting steam, place your pressure regulator weight over the vent pipe. Allow the internal pressure inside the canner to rise to ten pounds of pressure, or adjust the pressure level according to your specific geographical altitude.
Step 16 Once your pressure canner reaches the correct target pressure, start your timer immediately. Process pint size jars of ground beef for seventy five full minutes, or process quart size jars for ninety full minutes, keeping the heat steady so the pressure never drops below the required level.
Step 17 When the processing time ends, turn off your stove top heat completely. Allow the pressure canner to cool down naturally until the internal pressure gauge drops back to zero and the safety lock releases on its own. Never force the canner cool by pouring water over it or removing the weight early.
Step 18 Carefully open the pressure canner lid away from your face to avoid steam burns. Use a sturdy jar lifter tool to lift the hot glass jars straight up out of the canner and place them onto a thick towel on your counter.
Step 19 Leave the hot jars untouched for twenty four hours at room temperature. As the jars cool down, you will hear a distinct popping sound which signals that the flat lids have formed a secure vacuum seal.
Step 20 After twenty four hours, check each lid by pressing the center with your finger. If the lid does not flex or pop back up, the jar is properly sealed. Remove the metal screw bands, wipe the glass clean, label the jars with the date, and store them in a cool dark pantry.
Why This Recipe Is Special
This home canned ground beef recipe is truly special because it provides ultimate convenience without sacrificing nutritional value or flavor. Unlike commercially manufactured canned foods that are heavily processed and packed with artificial additives, your homemade canned meat contains only real ground beef, water, and pure salt. You have complete total control over the quality of the meat, the source of the protein, and the exact amount of sodium added to your food.
From a health and nutrition standpoint, ground beef preserved in glass jars retains its full profile of natural proteins, essential minerals like iron and zinc, and vital vitamin B complexes. Because the meat is cooked and preserved in its own natural juices or healthy broth, no valuable nutrients are lost down the sink drain during storage. It offers clean, wholesome, high quality protein that fits seamlessly into various eating styles such as low carb diets, keto plans, or traditional balanced nutrition.
The taste and texture of pressure canned beef is another reason why this recipe stands out as exceptional. The high temperature and steady pressure inside the canner act like a slow pressure cooker, making the meat extra tender, soft, and moist. The ground beef absorbs the rich flavor of the broth and salt deeply into every crumb, resulting in a rich savory profile that makes quick meals taste like they were simmered for hours on the stove.
Extra Tips For Better Taste
To take the flavor of your home canned ground beef to the next level, consider browning the meat with finely diced onions and fresh garlic before packing it into the glass jars. The sweet cooked onions and aromatic garlic will infuse the beef with deep savory notes while it processes inside the canner, giving you an instant base for pasta sauces and stews.
Another creative tip for enhanced taste is to replace plain boiling water with rich homemade beef bone broth or high quality vegetable stock. The rich gelatin and mineral content of bone broth creates a mouthwatering sauce right inside the jar that coats every piece of beef with incredible richness. You can also mix in subtle dried herbs like oregano, thyme, or bay leaves into the broth for aromatic flair.
If you enjoy Mexican style dishes, you can season half of your ground beef batch with chili powder, cumin, onion powder, and paprika right while browning the meat. When you open those specific jars later in the year, your taco meat is already fully seasoned, warmed, and ready to be stuffed into hard shell tacos or spread over crunchy tortilla chips for a fast dinner.
Always remember to use lean ground beef, ideally around 85 percent to 90 percent lean. Leaner meat yields much better results because excessive fat can float to the top of the jar, create a greasy layer, and potentially interfere with the rubber seal on your canning lids over time.
Final Thoughts
Learning how to can ground beef at home is an incredibly rewarding journey that brings immense practical value, great savings, and culinary ease to your kitchen routine. Having a row of neatly organized jars filled with delicious, tender, and fully cooked beef sitting on your pantry shelf gives you unmatched speed when preparing daily family dinners. Give this easy pressure canning recipe a try this weekend, and enjoy the true luxury of fast, healthy, and delicious homemade meals anytime you want.
Nutrition Details
Below you will find the approximate nutritional values for a single serving of canned ground beef based on a total jar size yield.
| Nutrient Name | Value Per Serving | Value Per Entire Pint Jar |
| Serving Size | 100 grams | 400 grams |
| Calories | 215 kcal | 860 kcal |
| Total Fat | 13 grams | 52 grams |
| Saturated Fat | 5 grams | 20 grams |
| Cholesterol | 70 milligrams | 280 milligrams |
| Sodium | 300 milligrams | 1200 milligrams |
| Total Carbohydrates | 0 grams | 0 grams |
| Dietary Fiber | 0 grams | 0 grams |
| Protein | 24 grams | 96 grams |
| Iron | 2.5 milligrams | 10 milligrams |
| Calcium | 18 milligrams | 72 milligrams |
Disclaimer
Everyone’s body is unique and individual nutritional requirements or health responses can vary significantly from person to person. The nutritional information provided in this guide is an estimate based on standard ingredient values and general cooking calculations. Always follow safe pressure canning guidelines established by trusted food safety authorities to ensure your home canned meats are completely safe for consumption. If you have specific dietary concerns, medical conditions, or health goals, consult with a qualified health professional or registered dietitian