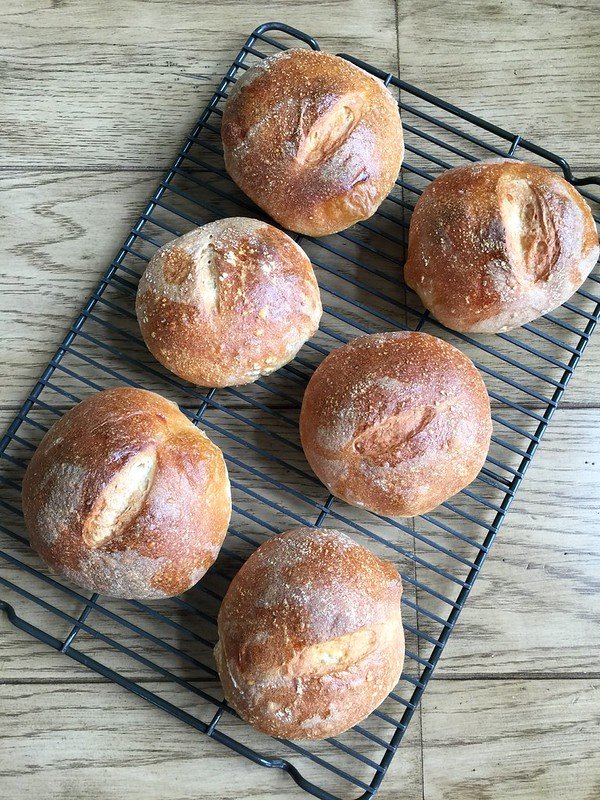
Mini Sourdough Slider Loaves are a wonderful delight for anyone who loves fresh homemade bread and delicious bite sized meals. This special recipe combines the deep rich flavor of traditional sourdough fermentation with the fun cute shape of small slider rolls. When you make these little loaves, you are taking basic household ingredients like flour water salt and starter and turning them into golden brown pillows of delicious soft bread. They have a delicate crispy outer crust that breaks open easily to reveal a pillowy light crumb inside that holds fillings without getting soggy. Perfect for mini burgers pulled meats cold cuts or simply served warm with rich melting butter, these little breads elevate any simple lunch or dinner into something truly memorable and impressive. Beginners often feel intimidated by sourdough baking because it seems complex, but this straightforward approach removes all the confusion and allows you to succeed on your very first try.
People everywhere absolutely fall in love with these small sourdough breads because they offer the best balance of rich tangy flavor and unbelievable softness. Unlike store bought slider buns which often contain artificial preservatives or feel dry and sticky in your mouth, these mini loaves are light natural and completely free from strange chemical additives. The soft interior structure supports heavy juicy meats while remaining tender enough to bite through without spilling all your toppings out the back. Children love them because of their cute small size which fits perfectly into little hands during family dinner nights, while adults appreciate the authentic artisan craft quality and deep fermentation depth. Furthermore they freeze exceptionally well, meaning you can easily make a large batch on the weekend and enjoy fresh tasting slider buns whenever you desire throughout the upcoming busy week.
There are so many wonderful emotional and practical reasons to bake these adorable slider loaves in your home kitchen right now. From an emotional perspective, kneading sourdough and filling your home with the warm comforting smell of fresh baking bread brings incredible stress relief and peaceful mindfulness after a long busy week. From a culinary perspective, these mini rolls are the undisputed star of any summer backyard party game night celebration or holiday dinner table where guests love assembling their own customizable mini sandwiches. From a health and fitness perspective, long natural fermentation breaks down heavy starches and gluten proteins in the grain, making this bread far easier on your stomach than fast commercially prepared breads. Whether you are aiming to eat cleaner food or simply want to impress your loved ones with something delicious, these mini sourdough slider loaves bring pure comfort and satisfaction to every single meal.
As you step into the wonderful world of home sourdough baking, you will quickly discover that making your own slider loaves is one of the most rewarding culinary skills you can ever learn. Baking your own bread gives you complete authority over what goes directly into your body, keeping your meals pure and healthy. The gentle process of measuring ingredients shaping the dough and watching it rise smoothly inside a warm oven creates a deep personal connection to your daily food. These mini slider loaves bring people together around the dinner table, encouraging sharing laughter and fun culinary creation as everyone builds their perfect custom bite. Once you taste the delicate tangy crumb paired with a lovely light crust, you will never want to return to boring factory made breads again.
Ingredients You Will Need
To ensure complete success, here are all the exact ingredients you need to gather before starting your recipe:
Active Sourdough Starter: 150 grams, lively bubbly and fully fed within the last six to eight hours Bread Flour: 500 grams, unbleached high protein white flour for optimal dough strength and structure Warm Water: 300 grams, clean filtered water warmed to comfortable room temperature around eighty degrees Fahrenheit Fine Sea Salt: 10 grams, pure unrefined salt without added iodine Raw Honey or Pure Maple Syrup: 25 grams, to add gentle natural sweetness and soften the bread interior Unsalted Butter: 35 grams, softened to room temperature for enhanced rich texture Whole Milk: 30 grams, added to the dough mixture for a tender creamy crumb Egg Yolk: 1 large egg yolk mixed with 1 tablespoon of water for the shiny top crust glaze Sesame Seeds: 2 tablespoons, optional topping for extra crunch and beautiful classic slider appearance
Step by Step Method
Step One: Preparing Your Active Starter Make sure your sourdough starter is active and bubbling before you begin mixing your ingredients. Feed your main starter four to six hours prior to starting this recipe so it doubles in volume and looks very light and airy. You can check if your starter is ready by dropping a small spoonful into a glass of room temperature water, and if it floats easily to the top surface, your starter is ready to make amazing slider loaves.
Step Two: Mixing the Wet Base and Flour Take a large clean glass or ceramic mixing bowl and pour in the warm water, active sourdough starter, raw honey, and whole milk. Stir these liquids gently using a wooden spoon or a dough whisk until the starter completely dissolves into a creamy smooth liquid. Next add all five hundred grams of high protein bread flour into the bowl. Mix everything together carefully until all the dry flour disappears and you are left with a rough shaggy ball of dough. Cover the bowl loosely with a damp cloth or plastic wrap and let it rest undisturbed for thirty minutes. This brief resting period is called autolyse, which helps the flour absorb liquid evenly and naturally relaxes the gluten networks.
Step Three: Incorporating Salt and Soft Butter After your thirty minute dough rest is complete, uncover the mixing bowl and sprinkle the fine sea salt evenly over the top of the dough. Add the softened unsalted butter directly on top as well. Now work the salt and butter into the dough using your clean hands by squeezing pinching and folding the dough over itself repeatedly. At first the dough may seem slippery and separate into pieces, but keep working gently for about five minutes until the butter integrates completely and the dough becomes smooth sticky and unified once again.
Step Four: Performing Stretch and Folds Instead of intense traditional kneading, sourdough benefits greatly from gentle stretching and folding actions over time. Leave your dough in the bowl, reach down beneath one side, lift a piece of dough upwards gently, and fold it over the top center. Turn the bowl ninety degrees and repeat this exact lifting and folding motion on all four sides of the dough. Cover the bowl again and let it rest for thirty minutes. Repeat this complete stretch and fold routine three more times over the next two hours, spacing each round thirty minutes apart. You will notice the dough changing from a sticky loose mixture into a strong smooth glossy ball.
Step Five: First Bulk Fermentation Once you finish your final round of stretches and folds, cover the bowl securely to keep moisture inside. Place the bowl in a warm draft free spot in your kitchen to undergo bulk fermentation. Allow the dough to rise naturally for roughly four to six hours, depending on how warm your kitchen room is. The dough is ready for the next stage when it increases in size by roughly fifty to seventy percent, feels light and airy when touched gently, and shows small bubbles rising beneath the surface.
Step Six: Dividing and Shaping Mini Loaves Lightly dust your clean kitchen counter with a tiny amount of flour and gently tip the fermented dough out of the bowl. Avoid pressing down too hard so you do not deflate the precious air bubbles inside. Using a bench scraper or sharp knife, divide the dough carefully into twelve equal portions, each weighing around sixty five to seventy grams. To shape each piece into a mini loaf, flatten the piece lightly into a small rectangle, fold the top down to the middle, fold the bottom up, and roll it tightly into a smooth cylindrical mini loaf shape. Pinch the side seams closed using your fingers so the roll holds its shape.
Step Seven: Final Proofing Line a large baking sheet with parchment paper or lightly grease a rectangular baking pan. Arrange your twelve shaped mini slider loaves side by side on the tray, leaving roughly half an inch of space between each piece. Leaving a small gap allows them to grow together softly as they bake, creating that classic soft slider pull apart edge. Cover the tray loosely with a clean lightweight kitchen towel and let them proof at room temperature for two to three hours until they double in size and look puffy and jiggly.
Step Eight: Glazing and Topping Preheat your main home oven to three hundred and seventy five degrees Fahrenheit so it reaches full heat before baking. While the oven warms up, prepare your simple egg wash by whisking one egg yolk with one tablespoon of water in a small cup until uniform. Gently brush the shiny egg wash liquid over the puffy tops of your mini sourdough loaves using a soft pastry brush. If you like, sprinkle a generous amount of sesame seeds or poppy seeds over the tops for extra texture and traditional burger bun charm.
Step Nine: Baking to Perfection Place the baking tray onto the center rack of your warm oven. Bake the mini sourdough slider loaves for twenty to twenty two minutes until the tops turn a gorgeous deep golden brown color and the sides look fully cooked. If you tap the top of a loaf lightly, it should feel hollow and light. Remove the pan safely from your oven and transfer the loaves onto a wire cooling rack immediately so the bottoms remain crisp and do not collect steam moisture. Allow them to cool down for at least twenty minutes before slicing open.
Why This Recipe Is Special
This unique recipe stands out from ordinary bread recipes for many incredible reasons, starting with its superior health benefits and remarkable digestive advantages. Traditional commercial slider buns rely heavily on chemical yeast, white sugar, artificial softeners, and quick processing times that force bread to rise artificially fast. In stark contrast, this mini sourdough recipe uses natural slow fermentation driven by wild yeasts and beneficial lactobacilli bacteria. During this long natural process, the beneficial bacteria consume complex sugars, breaking down tough gluten structures and phytic acid which normally block nutrient absorption in human digestion. Because of this natural breakdown, people who normally feel bloated or tired after eating standard store bread often find they can enjoy sourdough slider loaves comfortably without any stomach distress whatsoever.
Another major reason this recipe is special involves its perfect balance of textures and unmatched flavor profile. The inclusion of subtle natural honey, creamy whole milk, and rich unsalted butter turns standard lean sourdough into a soft rich dough often called enriched sourdough. Enriched sourdough provides the best of both worlds, giving you that delightful wild sourdough tang while maintaining a rich plush interior texture that melts softly in your mouth. Furthermore, the mini size offers remarkable portion control and presentation charm. Serving small slider loaves allows people to enjoy high quality homemade carbs in reasonable controlled portions while adding immense visual appeal to any dining table or social gathering.
Extra Tips for Better Taste
To take your mini sourdough slider loaves to the absolute next level of deliciousness, try applying these fun creative tips during your baking process. First, consider brushing the warm loaves with melted garlic butter and freshly chopped parsley immediately after pulling them hot out of the oven. This creates an irresistible savory aroma that makes them perfect for Italian meatball sliders or garlic bread bites. Second, if you love a savory cheesy twist, sprinkle a layer of finely shredded sharp cheddar cheese or grated parmesan over the tops during the final five minutes of baking so it melts into a crispy savory crown.
Third, pay close attention to your baking environment temperature during the bulk fermentation phase. Sourdough starter responds strongly to temperature changes, so if your kitchen feels cold during winter months, place your rising dough inside an turned off oven with the interior oven light switched on to provide a cozy warm microclimate. Fourth, always slice your slider loaves using a sharp serrated bread knife rather than a smooth chef knife, because a serrated blade cuts cleanly through soft bread without squishing the light airy interior structure. Finally, for an amazing breakfast twist, add a tiny dash of cinnamon and brown sugar into your dough mixture to create sweet breakfast slider rolls that pair wonderfully with warm scrambled eggs and savory bacon.
Final Thoughts
Baking your own Mini Sourdough Slider Loaves at home is a truly joyful journey that fills your kitchen with warmth, amazing smells, and delicious wholesome food. This simple beginner friendly method proves that artisan baking does not need to be complicated stressful or filled with hard rules. With just a handful of pure basic ingredients and a little patience, you can create soft adorable slider rolls that bring smiles to everyone around your dinner table. Whether you are hosting a lively weekend gathering, preparing school lunches, or simply enjoying a quiet cozy evening at home, these delicious mini sourdough loaves will surely become a cherished favorite recipe in your household for years to come.
Nutrition Details
Here is a helpful nutrition breakdown for this mini sourdough slider loaves recipe, showing total recipe values alongside individual values per single slider loaf serving:
Nutritional Value Table
Category: Total Recipe Amount | Per Single Slider Loaf Serving
Energy Value: 2460 Total Calories | 205 Calories per Serving
Total Carbohydrates: 410 Grams Total | 34.1 Grams per Serving
Dietary Fiber: 18 Grams Total | 1.5 Grams per Serving
Natural Sugars: 24 Grams Total | 2.0 Grams per Serving
Protein Content: 66 Grams Total | 5.5 Grams per Serving
Total Fat Content: 54 Grams Total | 4.5 Grams per Serving
Saturated Fat: 26 Grams Total | 2.1 Grams per Serving
Cholesterol Amount: 210 Milligrams Total | 17.5 Milligrams per Serving
Sodium Level: 3900 Milligrams Total | 325 Milligrams per Serving
Disclaimer
Please remember that all nutritional information provided in this article is an estimate calculated using standard ingredient databases and general baking averages. Exact nutritional values can vary based on specific ingredient brands, flour types, butter options, or minor adjustments you make in your personal kitchen. Everyone has unique dietary requirements, metabolism speeds, and health conditions, so individual results and digestive responses to sourdough baking may differ from person to person. If you have specific medical conditions, severe gluten allergies, or strict dietary restrictions, always consult with a qualified healthcare professional or certified dietitian before introducing new fermented foods into your routine.