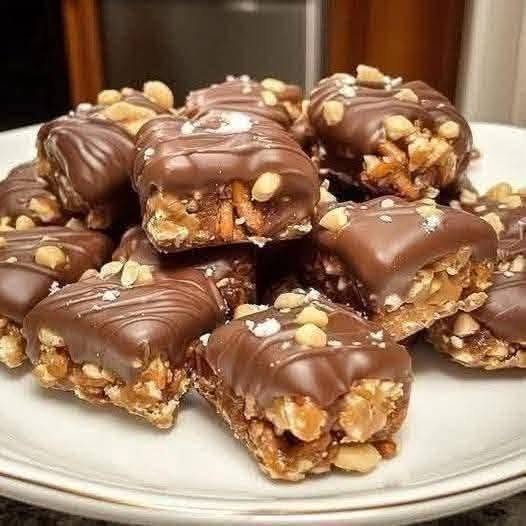
Welcome to the ultimate guide for making delicious homemade no bake chocolate peanut bars right in your own kitchen. This treat combines the rich flavor of creamy peanut butter with smooth melted chocolate to create a snack that tastes just like your favorite candy bar from the store. You do not need any special baking skills or advanced kitchen tools to pull this off successfully. In fact, you do not even need to turn on your oven at all, which makes this recipe a wonderful choice for hot summer days or busy weeknights. The combination of peanut butter and chocolate is a timeless favorite that people of all ages enjoy thoroughly. By making these treats at home, you take complete control over the ingredients, ensuring that every single bite is packed with pure flavor and quality. You will learn how to create a firm, satisfying peanut butter base topped with a shiny, silky layer of rich chocolate that sets perfectly in your refrigerator.
There are so many reasons why people everywhere absolutely fall in love with this simple dessert recipe. First of all, the simplicity of preparing it is nearly impossible to beat, especially for beginners who feel nervous around an oven. You only need a few basic pantry ingredients that you likely already have sitting on your kitchen shelves today. The preparation takes only about fifteen minutes of actual active work, meaning you can whip up a batch quickly before guests arrive or during a quick break in your busy day. Another reason people adore these treats is the incredible contrast of textures and flavors in every single slice. The base layer is dense, rich, sweet, and slightly salty, while the chocolate layer on top adds a smooth, creamy finish that melts instantly on your tongue. Kids love helping to mix the ingredients together, and adults appreciate how budget friendly and tasty the final result turns out every single time.
Food has a special way of connecting us to happy memories, and these peanut chocolate bars are pure comfort in every bite. Making this treat can bring back sweet memories of childhood afternoon snacks or fun weekend baking sessions with family members. It is the perfect recipe to make whenever you are craving something sweet, rich, and comforting after a long, tiring day at work or school. Preparing this dessert brings a wonderful sense of joy because the heavenly smell of peanut butter and warm cocoa fills your entire kitchen almost instantly. You can serve these treats at birthday parties, holiday gatherings, game nights with friends, or late night movie marathons with someone special. Slice them into small squares for a large crowd or cut them into generous pieces when you truly want to treat yourself. No matter when you choose to serve them, these bars bring smiles and satisfaction to everyone around the dining table.
Beyond being an absolute delight for your taste buds, this recipe fits amazingly well into modern, fast paced lifestyles and health conscious diets. If you are looking for a quick source of energy before a workout session, these bars offer a great combination of fats and carbohydrates to keep you going strong. Peanut butter naturally contains plant protein and healthy fats that help keep you feeling full and satisfied between your daily meals. When you make these snacks yourself at home, you can easily adjust the sweet levels or swap out traditional ingredients for healthier alternatives like natural nut butter, dark chocolate, or low sugar sweeteners. This flexibility makes the recipe fantastic for fitness enthusiasts, busy parents packing school lunchboxes, or anyone trying to avoid artificial preservatives found in packaged snacks. Having a cold container of these wholesome treats waiting in your fridge gives you total peace of mind whenever a sweet craving hits.
Ingredients You Will Need
To make these delicious bars, you will need a few simple ingredients. You can find all of these items easily at your local grocery store. Using good quality ingredients will give your bars the best texture and taste.
-
1 cup unsalted butter (Melted completely and allowed to cool slightly for two minutes)
-
2 cups graham cracker crumbs (Finely crushed into smooth powder using a food processor or a rolling pin inside a bag)
-
2 cups powdered sugar (Sifted to remove any hard lumps for a smooth texture)
-
1 cup creamy peanut butter (Use smooth, commercial style peanut butter for the base layer to ensure it holds together)
-
1 and 1/2 cups semi sweet chocolate chips (You can also use dark chocolate chips or milk chocolate chips depending on your taste)
-
4 tablespoons creamy peanut butter (Reserved specifically to melt together with the chocolate chips for the top layer)
-
1/2 teaspoon pure vanilla extract (Optional, but adds a lovely warmth to the peanut butter base)
-
1/4 teaspoon fine sea salt (Optional, to balance the sweetness if your peanut butter is completely unsalted)
Ingredient Breakdown and Substitutions
Understanding your ingredients helps you make smart choices in the kitchen. Here is a closer look at what each item does in this recipe and how you can swap things if needed.
Peanut Butter
The star of the show is the peanut butter. Standard smooth peanut butter works best because it contains added oils that help the bars set firmly in the fridge. Natural peanut butter that separates into oil and liquid can sometimes make the bars too soft. However, if you prefer using natural peanut butter, make sure to stir it extremely well before measuring. You can also substitute almond butter, cashew butter, or sunflower seed butter if you have a peanut allergy.
Graham Cracker Crumbs
Graham crackers give the base its structure and a wonderful texture. They absorb the melted butter and peanut butter, creating a soft yet sturdy bar that does not crumble apart when cut. If graham crackers are not available in your region, you can use digestive biscuits, vanilla wafers, or tea biscuits instead. Simply crush them until they resemble fine sand.
Powdered Sugar
Powdered sugar, also known as confectioners sugar, binds the base together while adding sweetness. Do not replace powdered sugar with regular granulated white sugar. Granulated sugar will not dissolve in cold butter and will leave your bars with a gritty, crunchy texture. Powdered sugar melts smoothly into the mixture for a rich, silky mouthfeel.
Butter
Melted butter holds the crumbs and sugar together. Unsalted butter allows you to control the exact amount of salt in the dessert. If you only have salted butter on hand, that works completely fine too, just omit any extra added salt from the recipe. For a dairy free version, you can easily use melted vegan butter or coconut oil.
Chocolate Chips
Semi sweet chocolate chips create a perfectly balanced top layer that is neither too sweet nor too bitter. Milk chocolate makes the top layer sweeter and softer, while dark chocolate adds a rich, bold cocoa flavor that contrasts wonderfully with the sweet peanut base.
Step by Step Method
Making these bars is simple and fun. Follow these clear steps to achieve perfect results every single time.
Step 1: Prepare Your Baking Pan
Start by selecting a standard 9 by 9 inch square baking pan. If you prefer thinner bars, you can use a 9 by 13 inch rectangular pan instead. Line the inside of the pan with parchment paper or aluminum foil. Make sure to leave a little bit of extra paper hanging over the edges of the pan. This overhang acts as a handle later on, allowing you to lift the entire block of bars out of the pan easily without breaking them. Lightly grease the paper with a tiny amount of butter or non stick cooking spray to ensure nothing sticks.
Step 2: Crush the Biscuits or Graham Crackers
If you purchased pre crushed graham cracker crumbs, you can skip this step. If you have whole crackers, place them inside a large, clear plastic storage bag. Seal the bag tightly, pressing out extra air. Use a rolling pin or a heavy saucepan to crush the crackers into fine crumbs. Alternatively, pulse the crackers in a food processor for fifteen seconds until they reach a sandy consistency. Ensure there are no large broken pieces left, as small, uniform crumbs create a firmer base.
Step 3: Melt the Butter
Place your one cup of unsalted butter into a heat safe bowl. Microwave the butter in short twenty second bursts until it is fully melted. Be careful not to overheat the butter so it does not splatter. Let the melted butter sit on your counter for two minutes to cool down slightly. It should be warm to the touch, not piping hot.
Step 4: Mix the Peanut Butter Base
In a large mixing bowl, combine the fine graham cracker crumbs, sifted powdered sugar, and melted butter. Add one cup of creamy peanut butter, vanilla extract, and salt if using. Use a strong wooden spoon or a silicone spatula to mix all the ingredients together. Keep stirring until everything is thoroughly combined and no dry white sugar streaks remain visible. The mixture should feel thick, dense, and slightly warm.
Step 5: Press the Base Layer into the Pan
Transfer the peanut butter mixture into your prepared baking pan. Spread it out evenly into all four corners using your spatula. Then, use the bottom of a clean flat glass, a measuring cup, or your fingers to press the mixture down as firmly as possible. Pressing down hard is the secret to getting clean, neat bars that do not crumble when you cut them. Take your time to create a smooth, flat surface.
Step 6: Melt the Chocolate and Peanut Butter Layer
Place your one and a half cups of semi sweet chocolate chips and four tablespoons of creamy peanut butter into a microwave safe bowl. Adding peanut butter directly to the chocolate chips is an important trick. It prevents the chocolate from becoming too hard and cracking when you slice into the cold bars later. Microwave the bowl in thirty second intervals, stopping to stir thoroughly after each interval. Repeat this process two or three times until the chocolate is completely melted, shiny, and smooth.
Step 7: Pour and Smooth the Chocolate Top
Pour the melted chocolate mixture evenly over the pressed peanut butter layer in your pan. Use an offset spatula or the back of a spoon to spread the chocolate out to the edges, covering the base completely. Gently tap the pan on your kitchen counter two or three times to release any trapped air bubbles and flatten the chocolate layer into a smooth, mirror like surface.
Step 8: Chill in the Refrigerator
Place the baking pan uncovered on a flat shelf in your refrigerator. Let the bars chill for at least two hours. This cooling period allows the butter to solidify, the crumbs to bind together, and the chocolate top layer to set firmly. If you are in a rush, you can place the pan in your freezer for forty five minutes instead.
Step 9: Lift and Slice the Bars
Once the chocolate is firm to the touch, remove the pan from the refrigerator. Grab the overlapping edges of the parchment paper and gently lift the entire block of bars out of the pan onto a cutting board. Take a large, sharp knife and wipe it clean with a warm, damp cloth. Slice the block into neat rows to create sixteen square bars or twenty four smaller bite sized squares. Wiping the knife blade warm between cuts ensures ultra clean edges.
Step 10: Serve and Store
Your homemade treats are now ready to enjoy. Serve them immediately while chilled or at cool room temperature. Put any leftover bars into an airtight container. Keep them stored in the refrigerator for up to two weeks, or freeze them for up to three months.
Why This Recipe Is Special
This simple recipe holds a special place in home kitchens for many practical and delicious reasons. Here is what makes it stand out from typical baked treats.
No Baking Required
The most obvious benefit of this recipe is that it requires zero oven time. Baking can sometimes feel intimidating, especially when worrying about oven temperatures, rising times, or burning the bottom of your pans. With this method, you completely eliminate those worries. It saves energy, keeps your kitchen cool during warm weather, and cuts down on overall preparation time significantly.
Wonderful Texture Balance
The combination of textures in this dessert is truly remarkable. The bottom layer offers a rich, dense, slightly soft chew from the mixture of crushed crackers, sugar, and peanut butter. The top layer provides a smooth, velvety chocolate coating that yields gently under your knife and melts effortlessly in your mouth. This contrast creates a delightful eating experience in every bite.
Simple and Accessible Ingredients
You do not need gourmet specialty products or hard to find items to prepare this dish. Every ingredient is inexpensive and readily available at standard supermarkets anywhere in the world. It is an affordable way to make a large batch of delicious treats for parties, school events, or family gatherings without spending much money.
Quick Preparation Time
Active preparation takes roughly fifteen minutes from start to finish. If you have sudden guests arriving or need a last minute dessert for a potluck dinner, you can whip this up quickly and let the refrigerator do the remaining work while you focus on other tasks.
Great for Cooking with Family
Because there is no hot oven involved in making the base, this recipe is safe and fun to make with young children. Kids love crushing the graham crackers, measuring out the sweet ingredients, and spreading the chocolate topping over the base layer.
Extra Tips for Better Taste
Want to take your bars from simple to incredible? Here are some creative tips and easy additions to make your dessert taste even better.
Add a Dash of Sea Salt
Sprinkling a tiny pinch of flaky sea salt over the melted chocolate layer right before chilling creates a wonderful sweet and salty flavor profile. Flaky sea salt cuts through the richness of the sugar and enhances the natural nuttiness of the peanut butter.
Use Roasted Nut Mixes
For added crunch, fold half a cup of finely chopped roasted peanuts into the base layer before pressing it into the pan. You can also mix in chopped walnuts, pecans, or toasted coconut flakes for a unique twist on the traditional recipe.
Layer in Some Crunchy texture
If you love extra crunch, try using crunch style peanut butter instead of smooth peanut butter for the base layer. You can also swap out half of the graham cracker crumbs for crushed pretzels or crisp rice cereal to give the bars a crispy, light texture.
Double the Chocolate Layer
If you are a serious chocolate lover, feel free to increase the chocolate layer. Use two full cups of chocolate chips and six tablespoons of peanut butter to create a thick, decadent chocolate canopy on top of your peanut base.
Warm Knife Technique for Slicing
To get perfectly clean slice marks like a professional bakery, run your sharp cutting knife under hot tap water for ten seconds. Wipe the blade completely dry with a towel, then make your first cut through the cold bars. Repeat this warming process before every single slice to slice through the set chocolate cleanly without cracking it.
Final Thoughts
Making delicious treats at home does not have to be complicated, expensive, or time consuming. These no bake chocolate peanut bars prove that simple ingredients combined with quick preparation can yield extraordinary results. Whether you are an absolute beginner in the kitchen or an experienced home cook looking for a rapid sweet fix, this recipe is sure to become a trusted favorite in your household. Give it a try this week, share a few slices with your loved ones, and enjoy every rich, chocolatey, peanut butter bite.
Nutrition Details
Here is an estimated nutritional breakdown for this recipe. Values are calculated per serving based on sixteen equal square bars.
Nutrition Table Per Serving
| Nutrient | Amount Per Serving |
| Calories | 310 kcal |
| Total Fat | 19 g |
| Saturated Fat | 9 g |
| Trans Fat | 0 g |
| Cholesterol | 15 mg |
| Sodium | 180 mg |
| Total Carbohydrate | 32 g |
| Dietary Fiber | 2 g |
| Total Sugars | 24 g |
| Protein | 5 g |
| Calcium | 20 mg |
| Iron | 1.2 mg |
| Potassium | 150 mg |
Note: Nutritional values are approximate estimates and will vary depending on the specific brands and ingredient variations you choose to use.
Disclaimer
Everyone’s body and dietary needs are unique. The nutritional information and health suggestions provided in this article are meant for general educational purposes only and should not be taken as professional medical or dietary advice. Ingredient substitutions, portion sizes, individual metabolic rates, and specific product brands will alter the overall nutritional values and dietary impacts of this recipe. If you have specific dietary restrictions, food allergies, diabetes, or health concerns, please consult a qualified physician or registered dietitian before introducing new foods into your routine. Always check ingredient labels carefully if you are preparing food for individuals with severe peanut or dairy allergies.