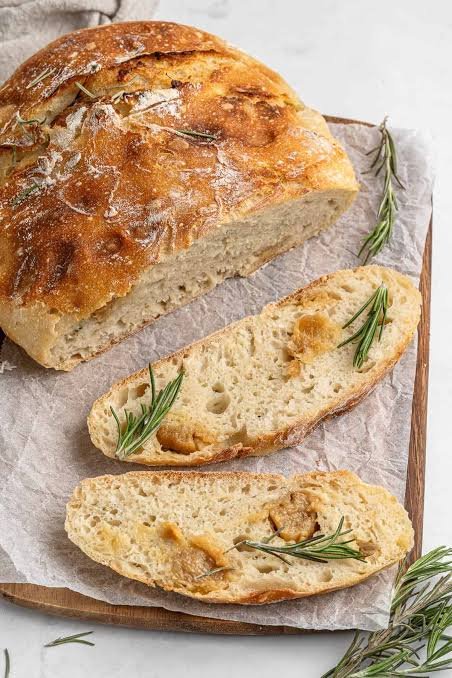
Freshly baked bread brings a warm feeling into any home kitchen, especially when that bread is packed with real garlic flavor. This sourdough no knead garlic bread recipe is designed to help you make amazing homemade bread without spending hours tiredly working the dough with your hands. Traditional bread making often requires heavy physical work, constant watching, and complex skills that can scare away beginners. However, this gentle approach relies on natural fermentation and slow rest time to build structure and rich taste. You end up with a golden crust on the outside that crackles when you cut it open, while the inside remains soft, airy, and filled with sweet roasted garlic notes.
People all around the world fall in love with this recipe because it gives you bakery quality results with minimal active effort. The natural sourdough process breaks down gluten and phytic acid over time, making the finished bread much easier on your stomach than quick commercial loaves. When you mix garlic directly into the dough and brush more butter on top, every single slice offers an irresistible savory aroma. Families love gathering around the kitchen counter when a fresh loaf comes out of the oven. It tastes like something you would order at a high end restaurant, yet you made it yourself using simple pantry ingredients.
This recipe is ideal for lazy weekend baking sessions, family holiday dinners, or cozy winter evenings when you crave comforting food. Making your own bread is also a great emotional stress reliever because watching simple flour and water transform into a beautiful loaf gives you a deep sense of satisfaction. From a health and fitness view, using wild sourdough starter instead of processed quick yeast provides better digestion and stable energy without artificial chemical additives. You can serve this garlic loaf alongside hearty pasta dishes, warm vegetable soups, fresh garden salads, or simply eat a warm slice with extra salted butter after a long day at work.
If you have never baked sourdough before, this easy no knead method is the absolute best way to start your home baking journey. You do not need expensive stand mixers or professional baking tools to achieve a marvelous result. All you need is a big mixing bowl, basic measuring tools, a hot oven, and a bit of patience while time does all the heavy work for you. The combination of gentle fermentation, soft garlic butter, and crisp outer crust will make this recipe a favorite in your household. Let us dive into everything you need to know to bake this marvelous garlic sourdough loaf today.
Ingredients You Will Need
To make one large loaf of homemade sourdough no knead garlic bread, prepare the following fresh ingredients:
- Active sourdough starter: 100 grams (bubbly and well fed)
- Warm clean water: 350 grams (preferably filtered water without chlorine)
- Bread flour: 450 grams (high protein flour gives the best crust)
- Whole wheat flour: 50 grams (adds extra depth and nutty flavor)
- Fine sea salt: 10 grams (enhances flavor and controls yeast)
- Fresh garlic cloves: 10 whole cloves (peeled and finely minced or roasted)
- Unsalted butter: 60 grams (melted for brushing and dough folding)
- Fresh parsley: 2 tablespoons (finely chopped for color and fresh herbal taste)
- Olive oil: 1 tablespoon (for greasing the bowl during long rest)
Step by Step Method
Step 1: Preparing the Garlic Butter Mixture
Start by preparing your fresh garlic filling so it has time to cool down before meeting the dough. Take a small saucepan and place it on low heat on your stove. Add the melted unsalted butter and minced garlic cloves into the pan. Stir gently for about three to four minutes until the garlic becomes fragrant and soft without burning or turning brown. Burning garlic will make your bread taste bitter, so keep the heat low. Once soft, remove the pan from the heat, stir in the chopped fresh parsley, and let the mixture sit at room temperature until cool.
Step 2: Mixing the Sourdough Starter and Water
Take a large mixing bowl and place it on your digital kitchen scale. Pour in 100 grams of active, bubbly sourdough starter that was fed a few hours earlier. Add 350 grams of warm clean water directly into the starter. Use a wooden spoon or a spatula to stir the mixture until the sourdough starter dissolves completely in the water, creating a cloudy liquid.
Step 3: Combining the Flours and Salt
Add 450 grams of bread flour, 50 grams of whole wheat flour, and 10 grams of fine sea salt into the bowl with the wet mixture. Stir everything together using your hands or a sturdy wooden spoon. Mix until all the dry flour disappears into the dough. The dough will look shaggy, rough, and sticky at this stage, which is completely normal for a no knead bread. Cover the bowl with a damp cloth or plastic cover and let it rest undisturbed for thirty minutes at room temperature.
Step 4: Adding the Garlic Filling
After thirty minutes of resting, uncover your dough bowl. Drizzle half of your cooled garlic butter mixture over the top of the dough. Instead of kneading, you will perform simple stretch and fold movements. Reach down under one edge of the dough with clean damp hands, pull the dough upward gently, and fold it over the center. Turn the bowl ninety degrees and repeat this action on all four sides. Cover the bowl and rest for another thirty minutes. Repeat this stretch and fold process three more times every thirty minutes, adding the remaining garlic butter during the second fold.
Step 5: The Long Bulk Fermentation
Once all stretch and fold sessions are finished, cover the bowl tightly with plastic wrap or a secure lid. Place the bowl in a warm place in your kitchen to undergo bulk fermentation. Allow the dough to rise for six to eight hours, or until it has increased in volume by about fifty percent and shows visible air bubbles on the surface. Sourdough rises slower than regular yeast, so trust the visual signs rather than strict clock times.
Step 6: Shaping the Garlic Loaf
Flour your clean kitchen counter surface generously with extra bread flour. Gently tip the risen dough out of the bowl onto the counter. Gently pat the dough into a smooth flat circle without crushing all the internal air bubbles. Fold the top edge down to the middle, bring the bottom edge up to the middle, and then roll the sides inward to create a round ball. Drag the ball gently across the counter toward your body to build outer surface tension.
Step 7: Final Cold Proofing
Line a baking basket or a round mixing bowl with a clean cotton towel and dust it heavily with rice flour or regular flour. Place your shaped garlic dough ball upside down into the basket so the smooth top rests on the bottom. Cover the top loosely and place the basket inside your refrigerator for eight to twelve hours. Cold proofing slows down yeast growth while continuing flavor development, making the final bread extra tasty and easy to score.
Step 8: Preheating the Oven and Dutch Oven
When you are ready to bake, place a heavy iron Dutch oven with its lid on inside your oven. Preheat your oven to 230 degrees Celsius or 450 degrees Fahrenheit for at least forty five minutes. A hot Dutch oven creates trapped steam, which is the secret to getting a crispy outer crust and high rise in home ovens.
Step 9: Scoring and Baking
Carefully take your dough out of the refrigerator and invert it onto a piece of parchment paper. Use a sharp razor blade or kitchen knife to cut a shallow line across the top of the dough ball. This cut lets steam escape so the loaf expands evenly. Use oven mitts to carefully remove the hot Dutch oven from your oven. Lift the parchment paper carrying your dough and lower it gently into the hot pot. Place the lid back on and bake with the cover on for thirty minutes.
Step 10: Final Crisping and Serving
After thirty minutes, carefully remove the Dutch oven lid. You will see a pale, beautifully expanded loaf. Lower the oven temperature to 210 degrees Celsius or 410 degrees Fahrenheit and bake uncovered for another fifteen to twenty minutes until the crust turns golden brown and crunchy. Optionally, brush the hot top with a tiny bit extra melted butter right after taking it out. Place the loaf on a wire cooling rack and wait at least one hour before slicing so the internal texture sets properly.
Why This Recipe Is Special
This sourdough garlic bread stands out from standard store bought bread in many exciting ways:
- Better Digestion: The long sourdough fermentation breaks down difficult proteins like gluten naturally, making it gentler on sensitive stomachs.
- Zero Chemical Additives: Commercial bakery bread often contains preservatives and artificial dough conditioners, whereas this loaf contains pure natural ingredients.
- Rich Flavor Profile: Combining wild yeast sour notes with rich garlic and creamy butter creates a deep flavor experience that simple quick yeast cannot match.
- Crunchy Yet Soft Texture: The combination of baking in a covered Dutch oven creates a shell like outer crust while keeping the inside light and moist.
- Low Effort Process: You save your physical energy by skipping heavy hand kneading and letting natural time work the gluten bonds for you.
Extra Tips for Better Taste
To take your homemade garlic sourdough bread to an even higher culinary level, try these simple creative ideas:
- Use Roasted Whole Garlic: Instead of sautéing minced raw garlic, roast two whole heads of garlic in your oven until sweet and soft, then squeeze the soft garlic cloves directly into the dough folds.
- Add Fresh Herbs: Combine chopped rosemary, fresh thyme, or dried oregano into the garlic butter for an Italian herbal twist.
- Include Grated Parmesan: Sprinkle half a cup of freshly grated parmesan cheese or sharp cheddar over the dough during your last fold for a cheesy garlic experience.
- Dust with Rice Flour: Using rice flour inside your proofing basket prevents sticky dough from clinging to towels without burning in the hot oven.
- Misting Extra Water: Spritzing a small spray of clean water inside the hot Dutch oven before closing the lid generates extra steam for a glossier, blistered crust.
Final Thoughts
Baking your own sourdough no knead garlic bread at home is a deeply rewarding kitchen adventure that brings endless joy and fantastic aromas into your household. By taking advantage of natural time and simple techniques instead of laborious physical kneading, anyone can master this comforting craft regardless of past kitchen experience. Sharing fresh slices of warm garlic sourdough with family and friends creates wonderful mealtime memories that standard factory loaves can never replicate. Give yourself permission to enjoy the slow process, savor the buttery garlic taste, and celebrate your successful homemade baking victory.
Nutrition Details
Below is the estimated nutritional breakdown for one whole loaf and per single serving slice, based on dividing the final loaf into ten equal slices:
| Nutrient Category | Total Recipe (Whole Loaf) | Per Serving (1 Slice) |
| Calories | 2450 kcal | 245 kcal |
| Total Carbohydrates | 410 g | 41 g |
| Dietary Fiber | 22 g | 2.2 g |
| Total Sugars | 6 g | 0.6 g |
| Protein | 55 g | 5.5 g |
| Total Fat | 58 g | 5.8 g |
| Saturated Fat | 32 g | 3.2 g |
| Sodium | 3900 mg | 390 mg |
| Potassium | 650 mg | 65 mg |
Disclaimer
Please note that dietary needs and personal health conditions vary from person to person. Nutrition numbers provided in this recipe are general estimations calculated using standard ingredient databases and may change based on exact brands or quantities used. Sourdough fermentation can improve digestibility for many individuals, but people with severe wheat allergies or diagnosed celiac disease must avoid wheat flour products. Always listen to your body and consult a qualified healthcare professional or certified nutritionist if you have specific dietary restrictions or personal health questions.